How do I clean the ODS pilot assembly?
If your pilot will not stay lit, try cleaning it. Use a can of compressed air, such as is used to clean a computer, to blow dust out of the pilot assembly. Sometimes just blowing air back through the pilot will get rid of the dirt.
If that fails, turn off the gas supply to the heater. As indicated in Figure 5 below grab nut A with an open -end wrench and loosen nut B from the pilot tubing with another small adjustable wrench. Blow air pressure through the holes as indicated. This should blow out any foreign materials. To reassemble, tighten nut B by grabbing nut A with the open-end wrench. WARNING: When the heater is reassembled, always check for gas leaks. Apply a soap and water solution to all joints and watch for bubbles to check for gas leaks. Never use any open flame to check for gas leaks.
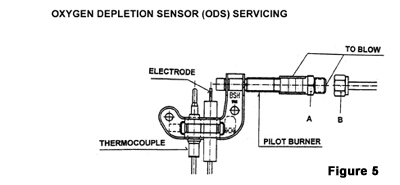
If that fails, you need to remove the orifice from the pilot burner cartridge using your wrenches to unscrew the orifice (Item A) and blow air through the pilot burner as show in Figure 5. If the pilot burner remains blocked you will need to use a soft brush (pipe cleaner will also work) to dislodge a spider web or other obstruction. To prevent damage to this assembly, follow the instructions below for disassembly and assembly of the ODS for cleaning. WARNING: Never use needles, wires, or similar cylindrical objects to clean the pilot orifice. This will only damage the calibrated pilot orifice (about the size of the head of a pin) which controls the pilot gas flow. Simple rinsing with water and blowing air over it should clean the orifice.